


MoonBeam3 app for iPhone and iPad
Developer: Roderick Dayton
First release : 12 Mar 2018
App size: 28.97 Mb
The MoonBeam3 initial application output is a dashboard with on-going data analytics emailed to you on a daily basis.
Drop down selection: The program manager may enter in drop-down selectable fields for pre-listing users, location, and specific uses and the user may then later select from among those options when using the device.
The application allows three selectable drop down fields that, if selected, are captured and reported along with the date, time, system and lamp status for each lamp.
To update the MB3 (One time only):
1) Press and hold the "connect" button on the base while you plug in the power cord to the base.
2) Open the MB3 app.
3) Tap the base icon and the app will open another screen where you will see Update firmware 2.X.X.
4) Tap "Update Firmware to 2.X.X" and the system will show "updating firmware". The process takes about two minutes.
5) The MoonBeam3 will then process the information and reboot into normal operating mode. This also takes about two minutes. If it does not reboot, simply unplug MB3 and plug it in again.
When complete, the MB3 will be in normal operating mode and the App will show the blue header, "MoonBeam Devices" but NO devices show. Power off the base and configure the application.
A) CONFIGURING THE APP TO YOU
On the main page of the MB3 App, with the blue header, MoonBeam Devices, at the far right is the "settings" gear icon. Tap it to configure the app.
A page comes up titled "Configuration" and below it are options. You MUST enter an email address. Everything else is optional.
1) Users - Tap "Users" and the "+" icon on the far right. Type in the name of an expected user of the MB3 and press the "save" icon on the far right (or the "Trash Can" icon to delete).
2) Locations - Tap and enter the locations where the device may be used.
3) Specific Uses - Tap and enter the uses of the device, i.e., Daily Clean, Terminal Clean, Isolation Clean, etc..
4) Email Addresses - Tap and enter the email address where the log files are delivered.
5) Set/Change Password - Tap and change the password to lock out any changes to the configuration. Note that if you need to reset the system due to a lost password, the configuration will be fully erased. The log files will not be erased.
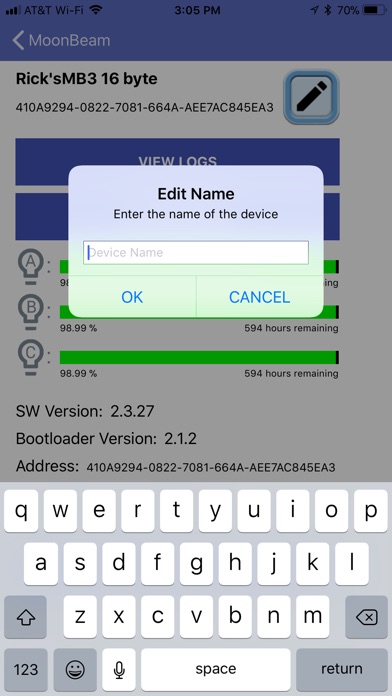
6) In the Dashboard page, tap "Update Clock"
7) Tap the system edit icon (pencil) and name the device with the serial number of the MoonBeam3. This is for traceability of logs.
EVERYTHING UP TO THIS POINT IS ONLY DONE AT SETUP -----------
B) TO USE THE APP:
1) Tap the MoonBeam3 App Icon on your device and, after the MoonBeam3 splash page, the main page will appear, but NO MB3 will be displayed.
2) At the bottom blue footer, tap "Enable Logging Mode on Base Devices." (If going through this installation and nothing happens or an error message appears when you tap "Enable Logging Mode on Base Devices", the work around is to press and hold the "Run Time" button while plugging in the MB3.)
3) After a few seconds, the MB3 base will be displayed.
4) Tap the base and after a few seconds the information from the base appears.
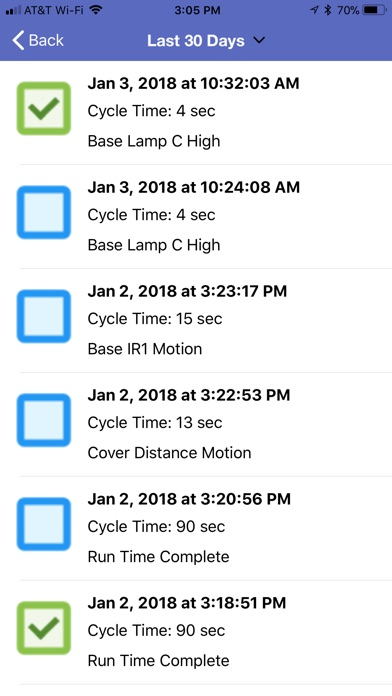
Tap "View Logs" and the system will display, "Downloading Log Data". This may take a while (~30 seconds) if the system is fully loaded with logs. The memory can hold about 1,000 disinfection cycles before writing over the oldest logs first. Note that when the "Downloading Log Data" disappears, the logs are downloaded.
Unless edited, logs have BLUE boxes. A green check mark indicates edited data.
Tap "User ID" and select from the list of users
Tap "Location" and select from the list of use locations
Tap "Specific Use and select from the list of uses
To Save, tap the "Save" icon.
To upload the logs, press the "<-" button at the top to return to the Dashboard page.
1) Tap "UPLOAD LOGS"
2) The default time frame is the last seven days. To change the range, tap "From" and select the date. The "To" date may also be changed.
3) Tap "Submit" .